
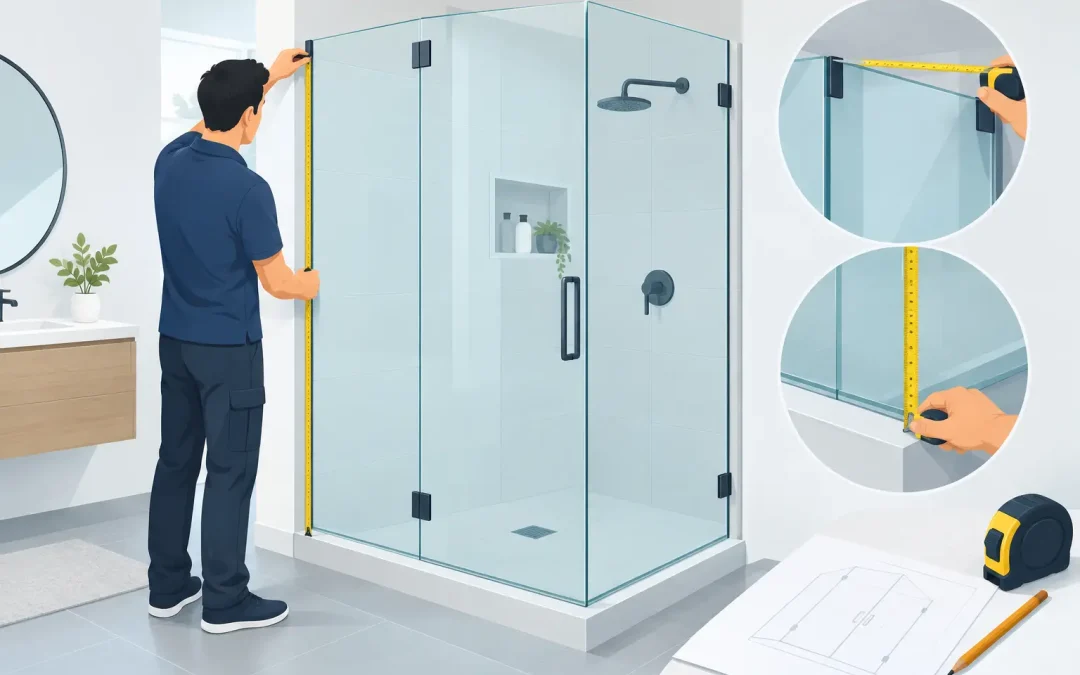
A shower screen can look straightforward until it is time to order the glass. A few millimetres can make the difference between a neat, watertight fit and a door that catches, leaks or will not close properly. Knowing how to measure shower glass gives you a useful starting point, but custom shower glass should always be checked on site before it is made.
That is because toughened safety glass cannot be trimmed after it has been manufactured. Holes, cut-outs and edges must all be allowed for before the glass goes into production. Your measurements help define the job, while a qualified glazier confirms the final dimensions, wall conditions and hardware required for a safe installation.
Start by identifying the shower screen style
Measure the finished shower area, not an early stage of a renovation. Tiles, waterproofing, shower trays, wall linings and flooring can all change the final opening. If tiling is still underway, wait until the surfaces the glass will sit against are complete.
The type of screen also changes what needs measuring. A fixed panel only needs a secure glass position and enough coverage to control splash. A hinged door needs clearance to open, suitable fixing points and a gap at the bottom. A sliding screen needs room for tracks and overlaps. A corner enclosure or neo-angle screen involves several panels, so the relationship between each wall matters as much as the overall width.
Before reaching for the tape measure, make a simple sketch of the shower from above and from the front. Mark which panel is fixed, which way the door opens, and where the shower head, vanity, toilet and towel rail sit. This makes it much easier to spot a door swing problem before glass is ordered.
How to measure shower glass openings
Use a good-quality metal tape measure marked in millimetres. Measure each opening at least three times: near the bottom, at the middle and near the top. Write every number on your sketch rather than relying on memory.
For a panel that sits between two tiled walls, measure the clear distance from finished wall to finished wall. Do not measure from plasterboard edges, tile trim that will be replaced, or temporary building materials. If the three measurements differ, record all of them. The smallest figure is often the limiting dimension, but the final glass size depends on the channel, hinges, brackets and adjustment available in the chosen system.
For a fixed screen on the edge of a shower tray or tiled floor, measure the available width along the line where the glass will be installed. Also measure the return panel if there is one. Record the proposed height from the finished shower base to the top of the glass, keeping in mind nearby windows, extractor fans and ceiling slopes.
Measure in millimetres, not centimetres. Saying an opening is “about 90 centimetres” is fine for an initial discussion, but it is not enough information to cut a custom panel. A difference of 10 mm may be significant when working with shower glass.
Check whether the walls are plumb
Bathroom walls are not always perfectly vertical, particularly in older homes or after a renovation. Hold a long spirit level against each wall where the glass will fix. If the wall leans in or out, note the direction and the amount of variation.
A small variation may be accommodated with an adjustable channel or hinge system. A larger difference may require a shaped glass edge, a wider channel or a change to the screen design. This is one reason a single width measurement is not enough for a made-to-measure enclosure.
Also check the floor or tray is level. Water needs to drain toward the waste, so shower floors commonly have a deliberate fall. The glass can be installed over a fall, but the bottom clearance, sweep and sealing method need to suit it. Do not assume the glass should sit hard on the floor.
Measure door clearance, not just the gap
For a hinged shower door, measure the opening width and the space in front of and beside the shower. Then use a piece of cardboard or masking tape to map out the door swing. This simple step can reveal whether an outward-opening door will hit a vanity, toilet, bath or heated towel rail.
Most shower doors open outwards for safety. If someone falls inside the shower, an inward-opening door can be difficult to open. However, the best arrangement depends on the bathroom layout. In a compact ensuite, a sliding door, fixed panel or a differently positioned hinge may be the more practical option.
Allow for handles too. A door may clear an obstacle while the handle does not. If the screen includes a return panel, make sure the handle has enough room to pass it without contact.
Record the details a glazier needs
Measurements are only one part of a shower glass quote. Clear photos and practical details help a glazier plan the right solution before attending site. Take photos straight on and from each side, including the full shower, floor, walls and surrounding fittings.
Note whether the walls are tiled, stone, acrylic, plasterboard or another surface. Tiles need careful drilling, and fixings must go into a suitable solid substrate rather than relying on tile alone. Point out any loose tiles, hollow-sounding areas, cracks or existing water damage. These issues may need attention before a new screen is installed.
It also helps to identify the shower base. Is it a pre-formed acrylic tray, a tiled floor, or a level-entry wet area? The answer affects sealing, glass positioning and whether a water bar or bottom seal is appropriate.
If you are replacing an existing screen, photograph the hinges, channels and handles as well. Older fittings may not be reusable with new glass, especially where corrosion, wear or non-standard hole positions are involved.
Common measuring mistakes to avoid
The most common mistake is measuring only once. Walls can taper, floors can fall and tile surfaces can vary. Three measurements across an opening show whether the space is consistent.
Another issue is allowing no clearance at all. Glass needs room for installation, movement and the selected hardware. The correct allowance is not a guess. It varies between a framed screen, a channel-fixed panel and a frameless hinged door.
People also sometimes measure from the wrong point. The critical line is where the glass will actually sit after all finishes are complete. A tile edge, silicone bead or raised tray lip can change that line.
Finally, do not plan to alter toughened glass after delivery. Once it has been toughened, it cannot be cut down, drilled or notched. Trying to modify it can cause the entire panel to shatter. If the opening changes during building work, the glass must be remeasured before manufacture.
When a professional measure is the sensible option
A basic fixed panel in a square, fully tiled opening is usually the simplest type of shower glass to assess. Even then, a professional site measure is worthwhile before ordering. The cost of remaking a panel that is a few millimetres wrong is far greater than confirming the dimensions first.
A professional measure is particularly important for frameless doors, corner enclosures, angled walls, floor-to-ceiling panels, older bathrooms and any screen requiring holes or cut-outs. The glazier can check the walls, recommend the right glass thickness and fittings, confirm door swing, and make sure the finished screen is safe and practical to use.
At Glass Direct, the aim is to make that process straightforward: measure the finished space, share your photos and preferred screen style, then let a qualified glazier confirm the details before custom glass is made. A well-measured shower screen should disappear into the room – keeping water where it belongs while making the bathroom feel open, clean and easy to use.